I’m @I-am-Future, currently I am an undergraduate of computer science in CUHK-Shenzhen, interested in deep learning, robotics and computer vision. I love computer science, from low level microprocessors and assembly to high level applications, such as deep learning, computer graphics, etc.
Welcome to my blog! This blog is established on Mar. 21st, 2023. The aim is to build such a blog website which can be used to share my programming / other knowledges. There are few categories in my blog, you can access them from the button at the top. These include:
Series of knowledge (such as “Deep Learning”, “Pandas-SQL”)
Some problems I had met (“Problem Solving”)
Some package/tools Quick Reference Handbook (“QRH”), etc.
Also, you can use the search button at the top for the topics you like. All of them are very interesting.
In this blog, I’ll tell how to perform cleaning in the OneDrive, in case the storage is full. OneDrive has a history version system, so if we don’t clean it, it will grow larger and larger.
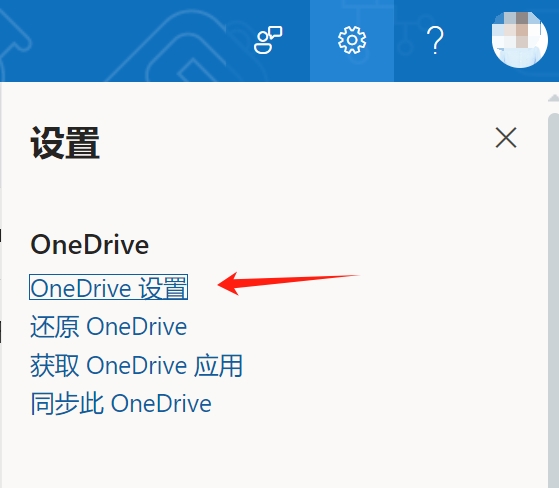
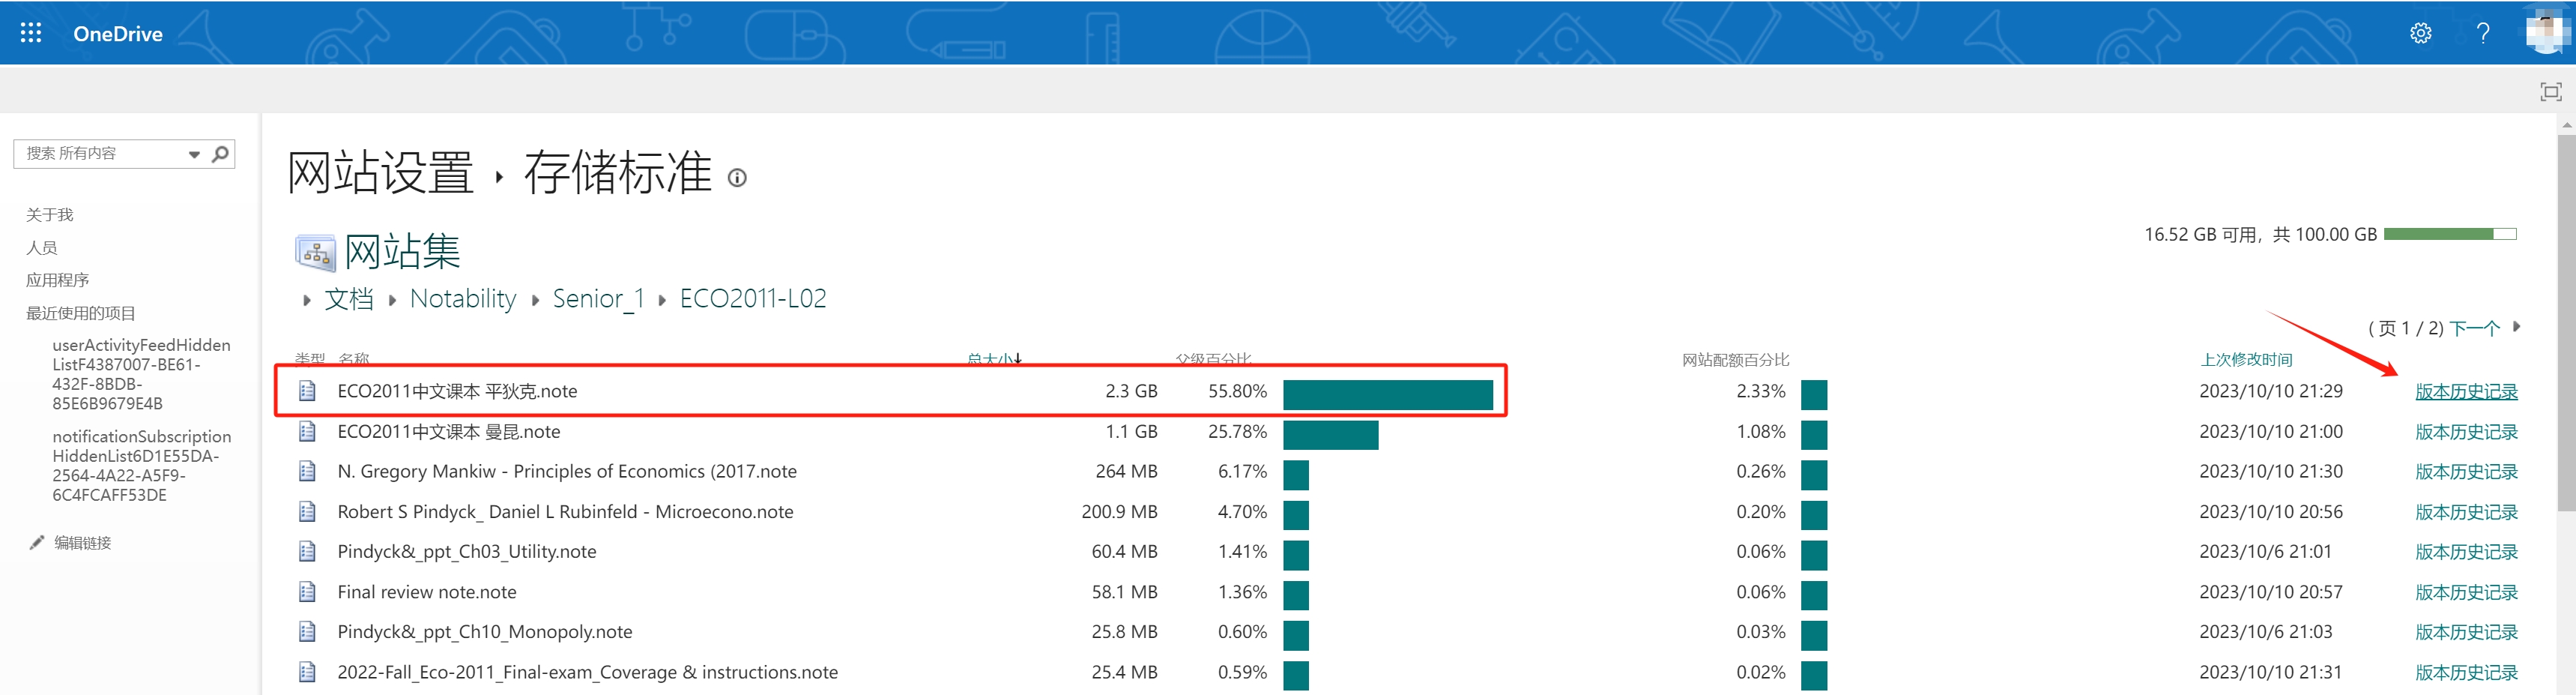
Click to the “settings” in the OneDrive App. Click the button. Jump to the website.
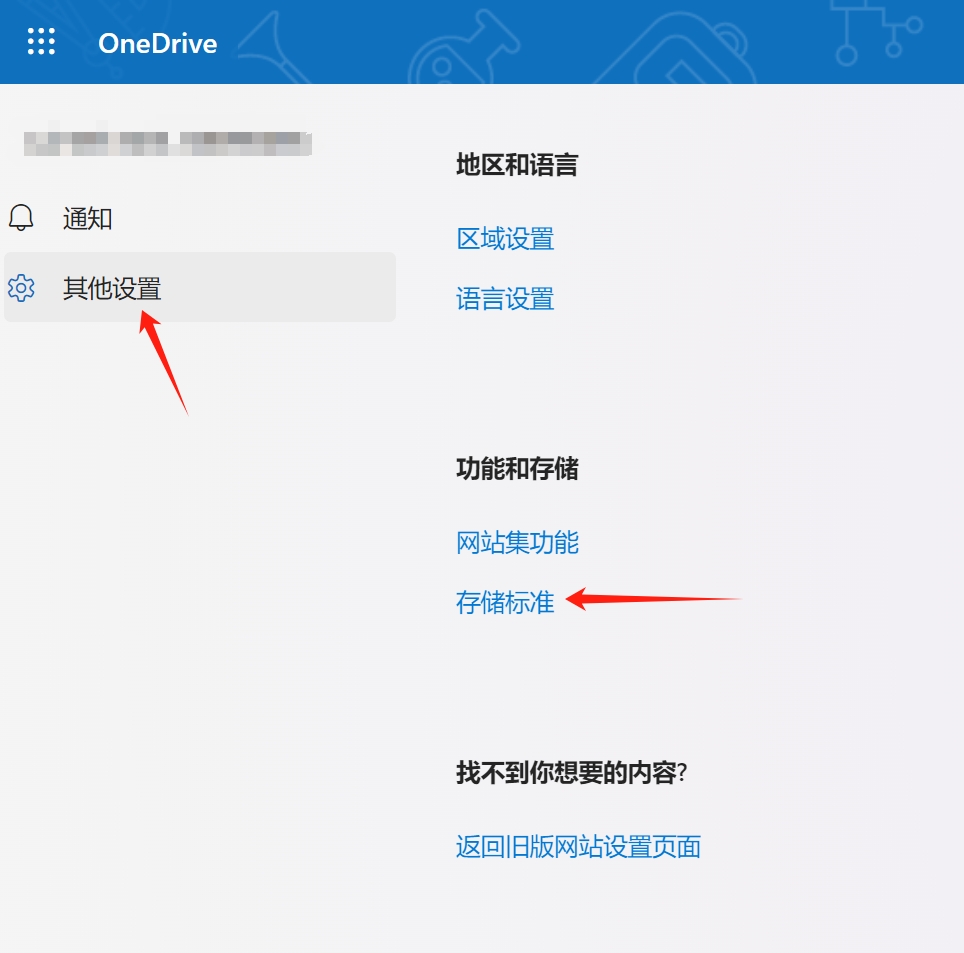
On the right top of the website, click settings and click this.
Go to this.
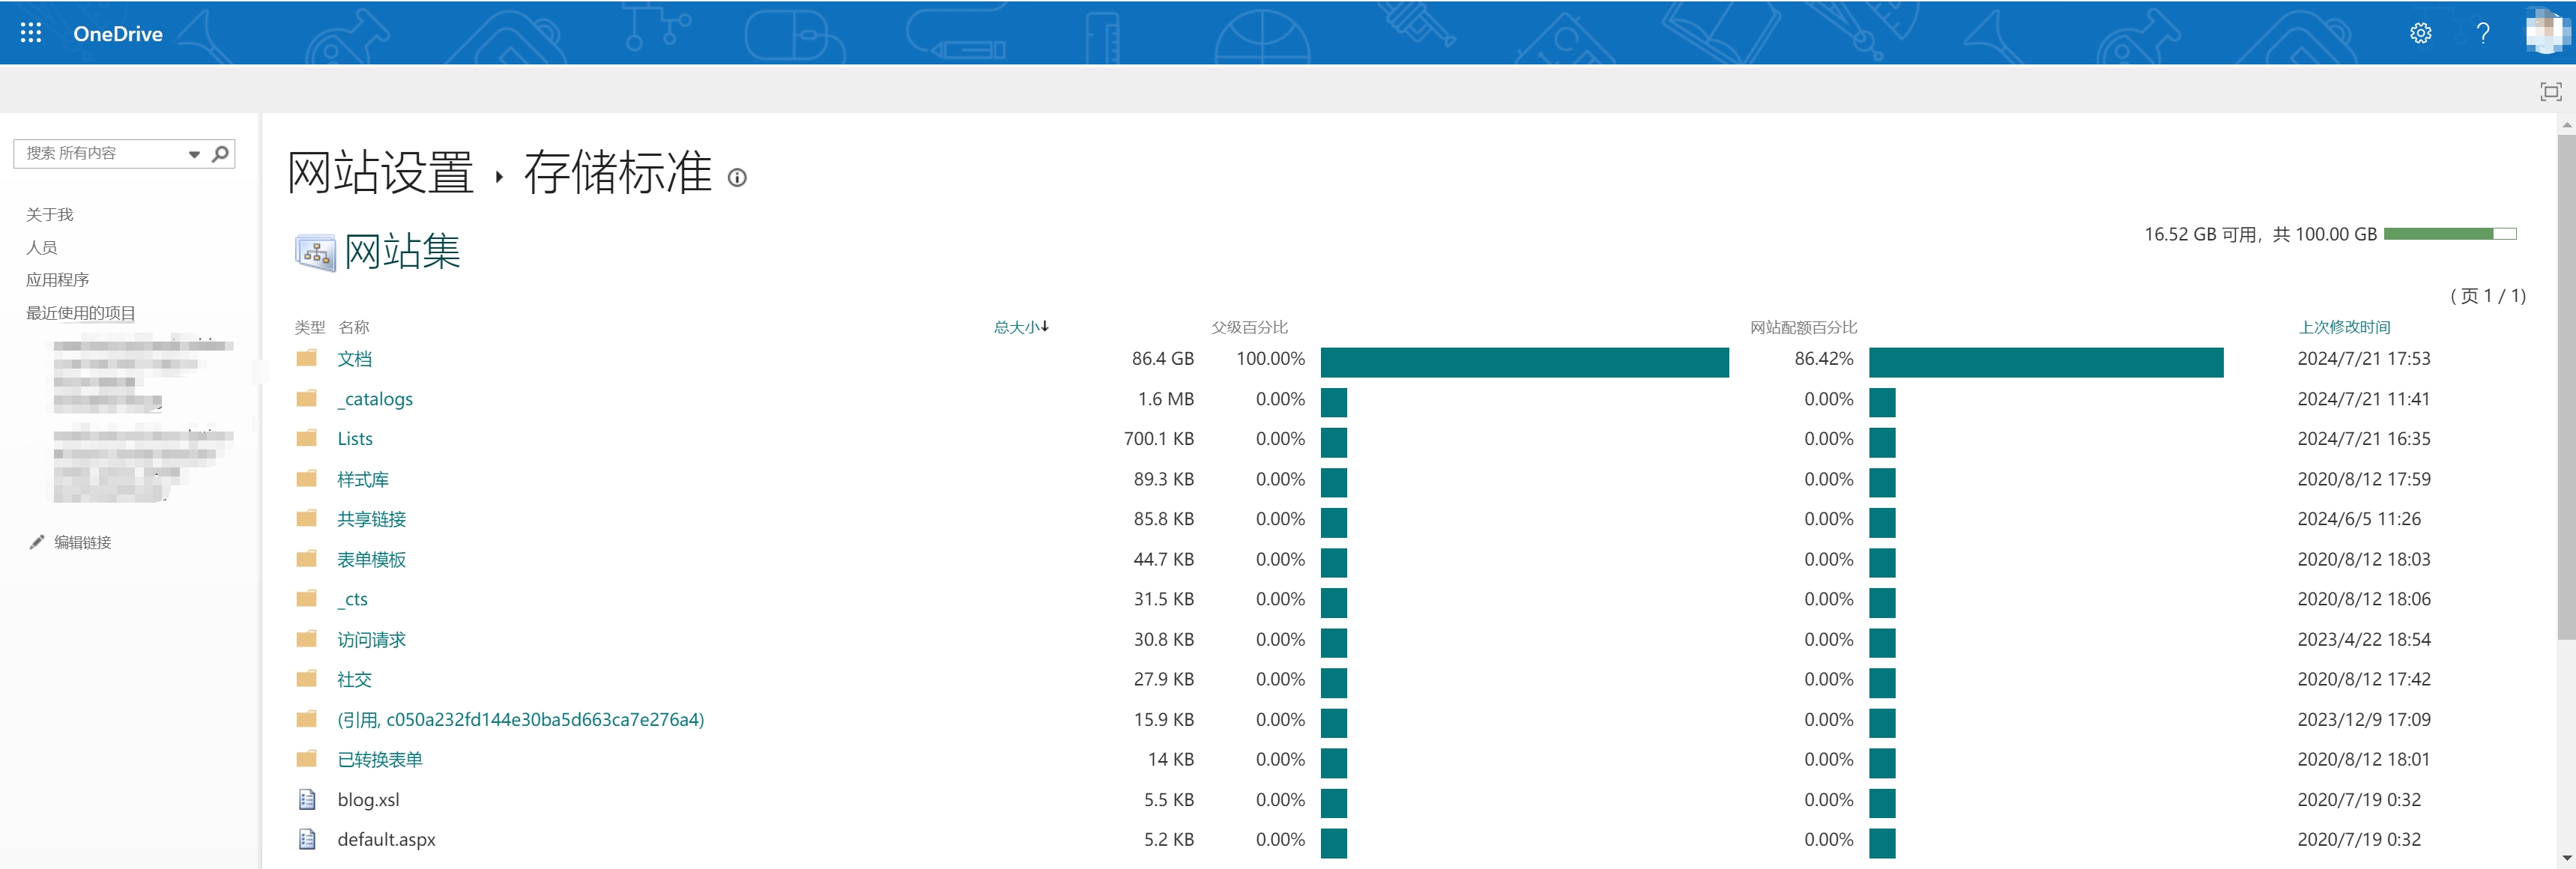
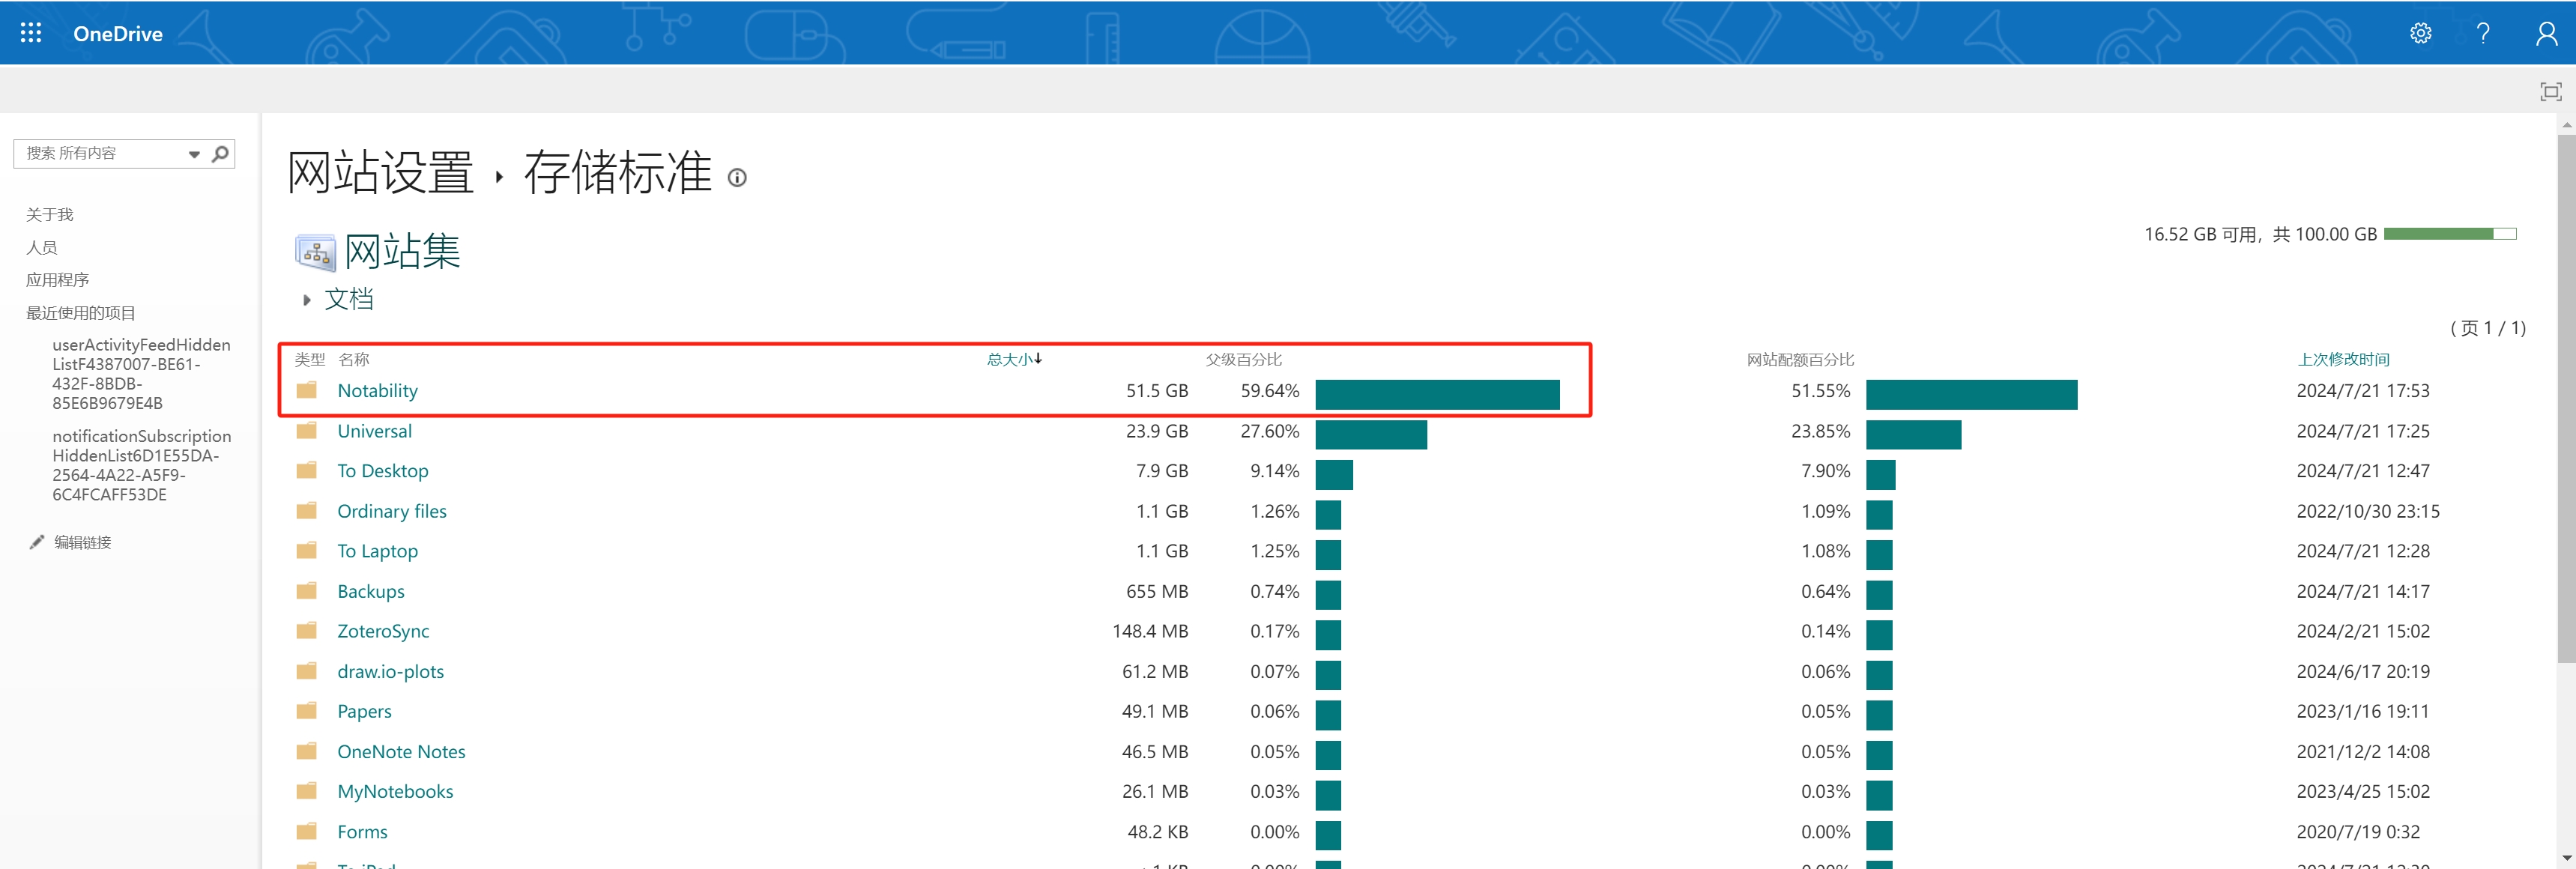
Then you’ll get to here. You can find the storage stats of each folder.
You can do deep cleaning by inspecting the files inside. Because of the version history management mechanism, sometimes it occupies too many storage on the file… Let’s clean it!
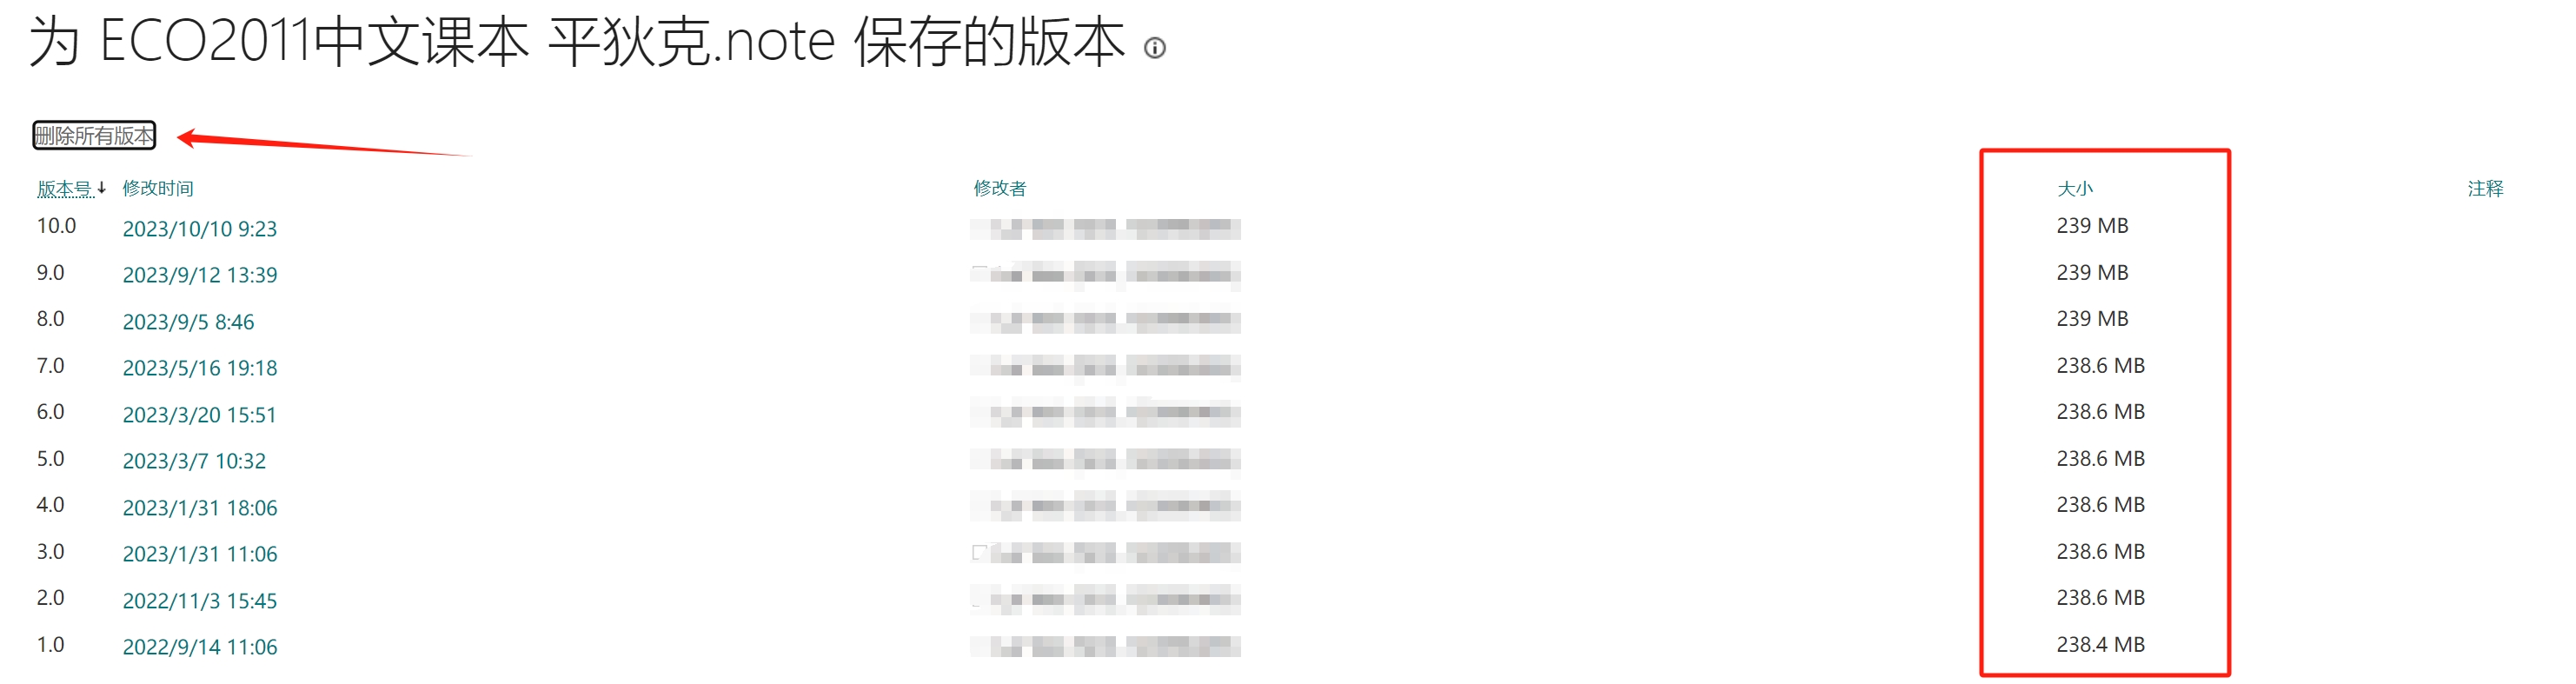
Oh my god this PDF has 10 versions, with each size 239MB… Click “Remove All History” to remove all history versions. This will not delete the newest.
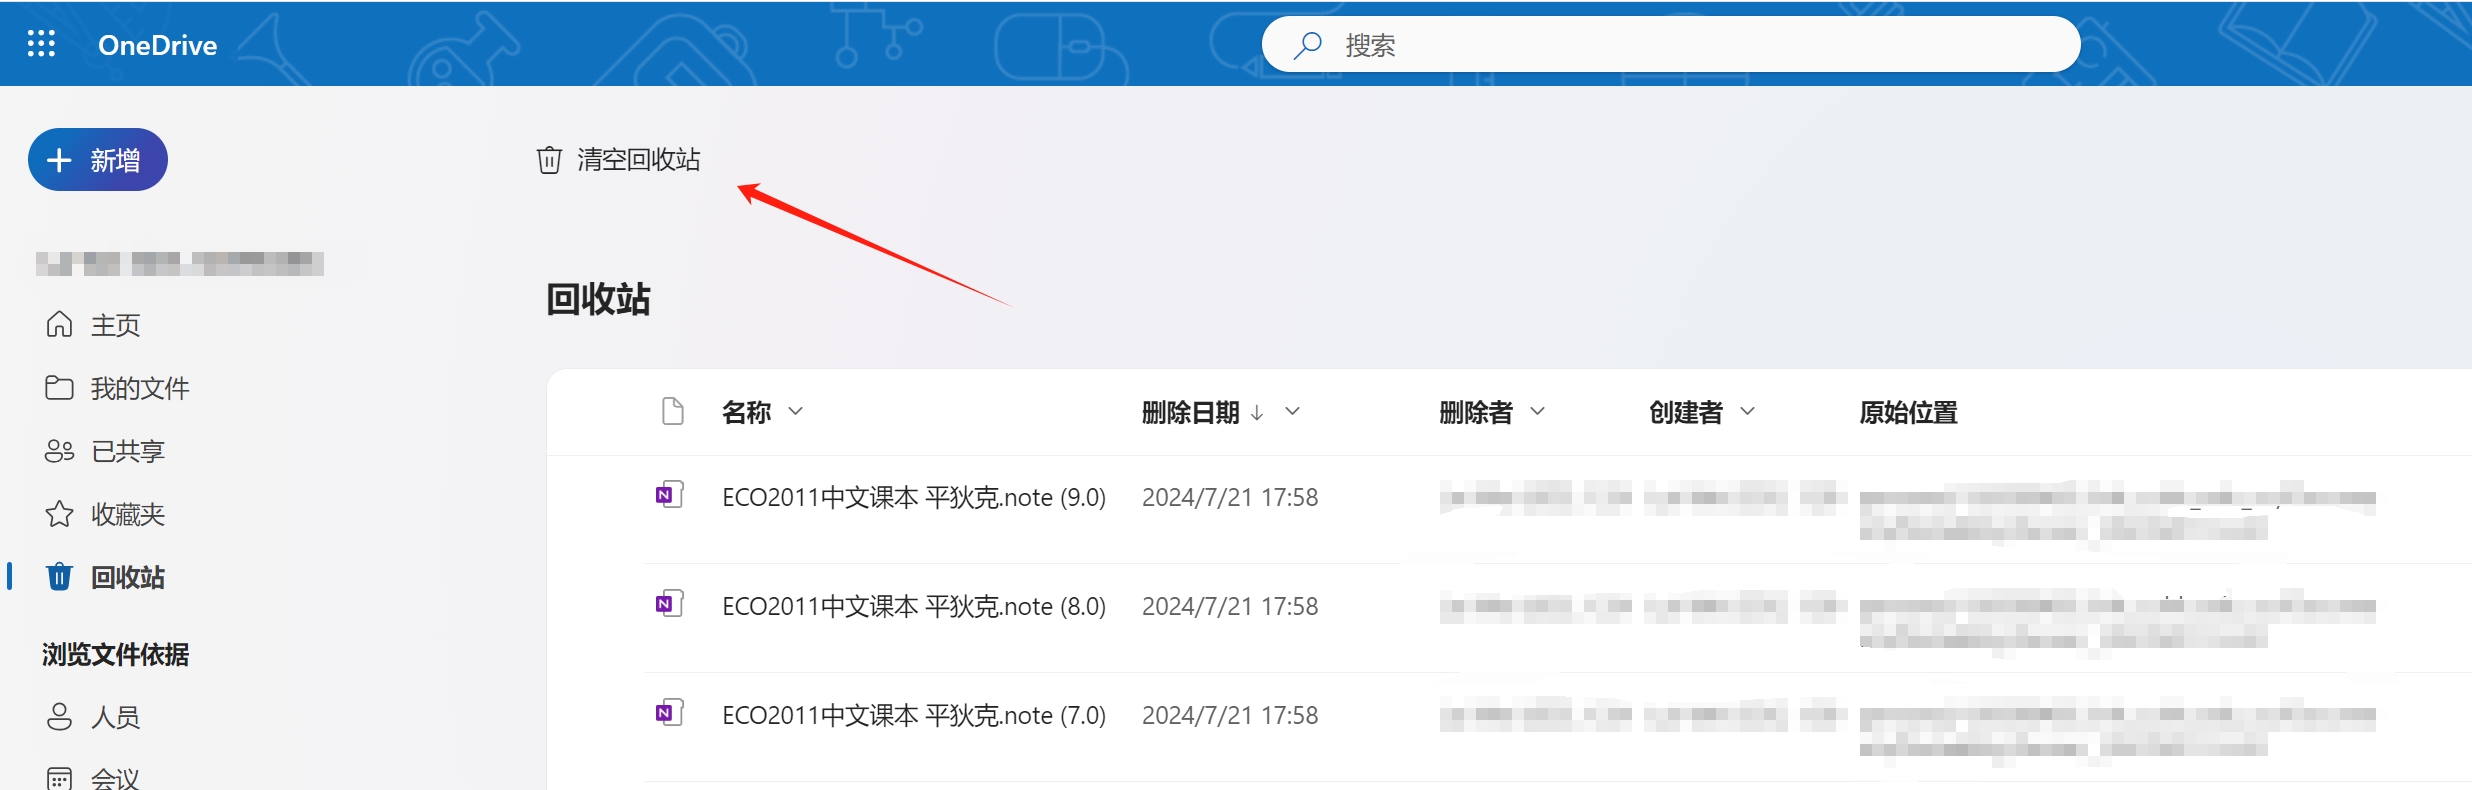
Finally don’t forget to go the trash bin to clean all of them!
When C++/Python/ROS Programs Encounter Segfaults Without Showing the Error Location: How to Quickly Locate the Bug?
Python Programs
When a Python program encounters a direct segfault, it’s likely due to an error in a C-written API. You can use Python’s built-in faulthandler module to display the exact location of the error. Documentation: https://docs.python.org/3/library/faulthandler.html
C/C++ Programs (Including ROS)
Check if Core Dumps Are Allowed:
Run ulimit -c.
If it returns 0, it means core dumps are not allowed. Use ulimit -c unlimited to allow unlimited core dumps, then rerun the program.
Locate the Core Dump File:
On Ubuntu, core dump files are usually managed by the apport system.
The apport script (a Python 3 program) is located at /usr/share/apport/apport.
The apport log, which records the activities related to crash handling and report generation, can be found at /var/log/apport.log.
By checking the apport log, you can determine the location of the core dump file, typically found in /var/crash/ with names like _executable_path.crash.
Launch GDB:
Use the command gdb /path/to/executable /path/to/coredump to load the executable and core dump files.
For ROS1, the executable can be found in the workspace under devel/lib/<node_name>.
For ROS2, the executable will be in install/<node_name>.
Get the Stack Trace at the Time of the Crash:
Inside GDB, use bt or backtrace to get the function call stack. Usually, locating the part of the call stack that with your code will reveal the bug.
Select and Inspect Specific Frames:
Use frame <frame_number> to select an interesting stack frame.
Use info locals to inspect local variables within that frame.
Use list to view the surrounding source code.
Inspect and Print Variables:
Use print <variable_name> to check the value of specific variables.
The native screen recording in Windows/MacOS has very high quality, so that the video are usually too large to share with others. For example, a 2-hour screen recording on MacOS consumes 14 GB memory!
However, we noticed that the screen recording from zoom/tencent meeting is very light-weight. A 2-hour screen recording costs only hundreds of megabytes!
So, if we want to share the screen recording from native system to others, can we convert it to the one like the zoom? It has smaller file size and the video is quality is enough for watching.
Observation & Analysis
We get two videos, from Tencent Meeting (tencent.mp4) and Windows Native recording (windows.mp4) respectively:
tencent.mp4
windows.mp4
Duration
6.7s
11.6s
File Size
261KB
11675KB
We found that the size of tencent.mp4 is far smaller (~20x) than the windows.mp4! Let’s analysis some details by the ffprobe provided by ffmpeg:
1 2 3 4
# Description: Get the information of the video file using ffprobe ffprobe -v error -show_format -show_streams tencent.mp4
tencent.mp4 uses the H.264 High Profile, which is suitable for high resolution and high compression efficiency.
windows.mp4 uses the H.264 Main Profile, which typically has slightly lower compression efficiency compared to the High Profile.
Frame Rate:
tencent.mp4 has a relatively low frame rate (approximately 15 fps), which helps to reduce file size.
windows.mp4 has a higher frame rate (60 fps), which significantly increases the file size.
Bit Rate:
tencent.mp4 has a very low bit rate (184243 bps), which greatly reduces file size but may affect video quality.
windows.mp4 has a very high bit rate (7457076 bps), which ensures higher video quality but also results in a much larger file size.
Audio Settings:
tencent.mp4 has mono audio and a lower sampling rate (32000 Hz), which helps to reduce file size.
windows.mp4 has stereo audio and a higher sampling rate (48000 Hz), which increases file size.
Solution
From the analysis above, we come up the plan to reduce the video file size. We use ffmpeg to convert the videos. The following Python script helps making the ffmpeg commands:
To convert the file, we apply the high profile, a low crf, a low bitrate and framerate. You may export the video and check whether the video is over-compressed.
Apple Silicon Acceleration
For Apple Silicon users, we may apply the Apple’s own H264 encoding library for acceleration. The command may look like this:
This blog is used to record my experience in installing Isaac Gym environment on the Linux Server. I’ll also write down all problems I met with troubleshooting.
Prerequisite
The followings are requirements provided by the project pages:
Ubuntu 18.04, or 20.04. Python 3.6, 3.7, or 3.8 Minimum recommended NVIDIA driver version: 470.74 (470 or above required) Minimum required hardware: NVIDIA Pascal or later GPU with at least 8gb of VRAM
Possible Problems
Don’t use WSL (Windows Subsystem on Linux)!!! The Nvidia driver on WSL may not support Vulkan well thus causing failure!
Download & Install
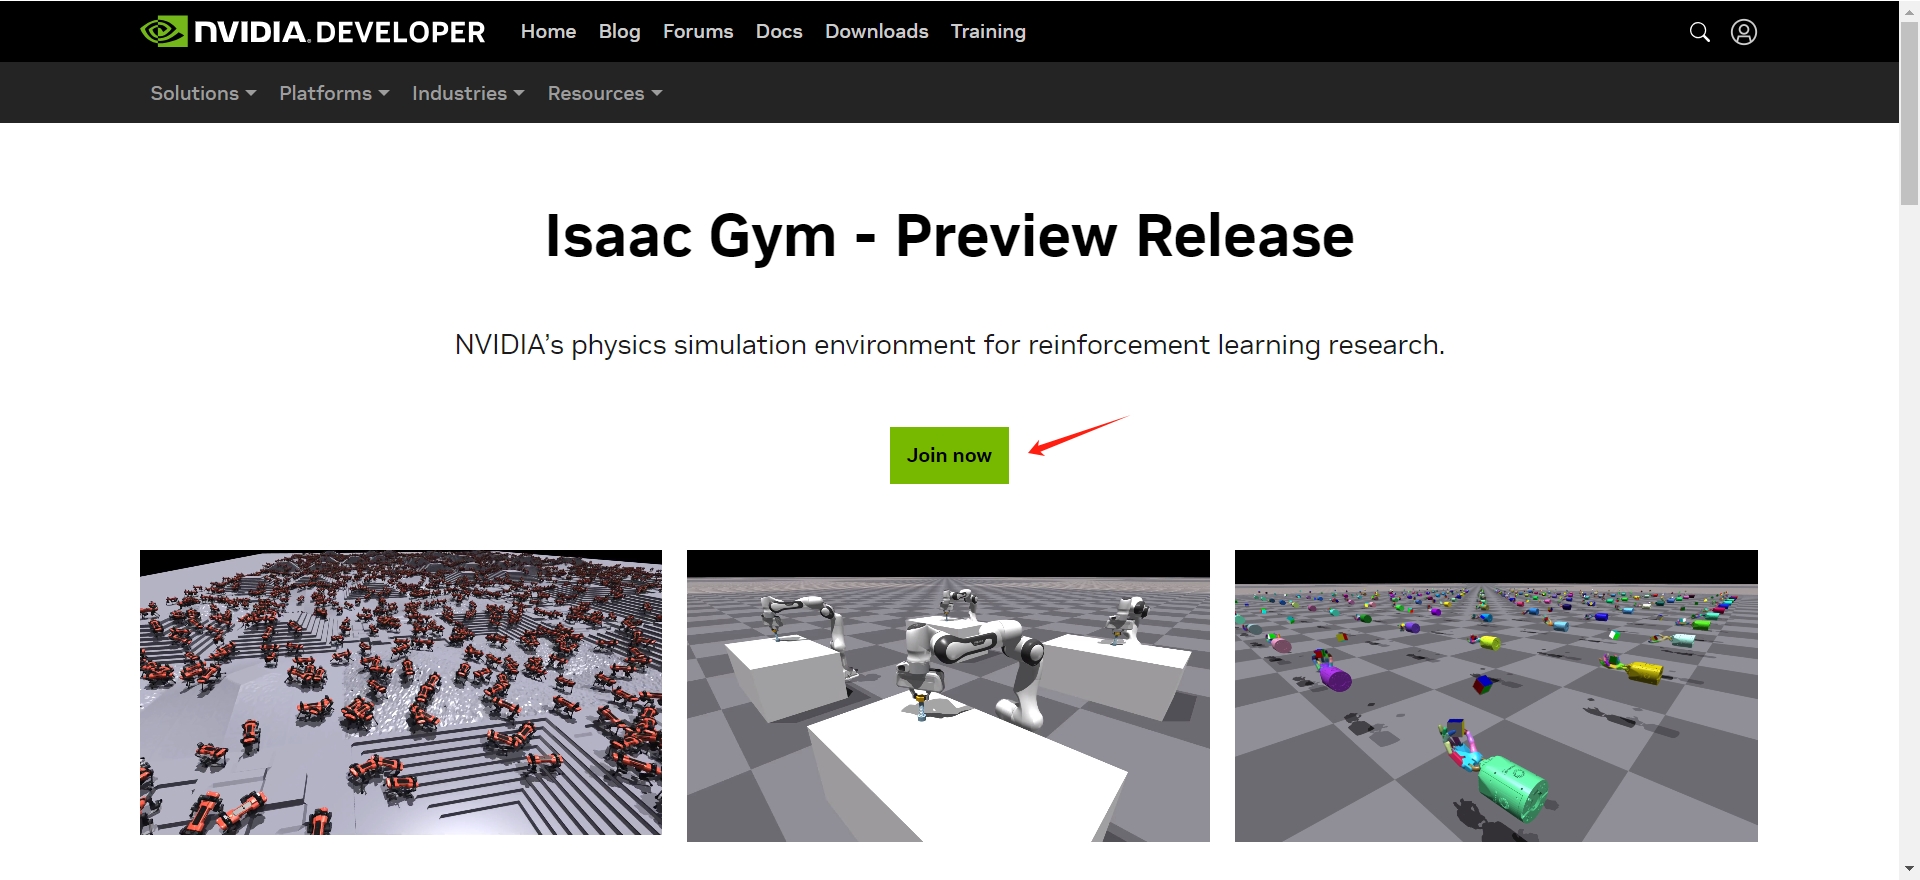
Register and download from https://developer.nvidia.com/isaac-gym/. Press “join now” first, and then fill the form, and finally you are ready to download it.
Put the download file, probably named IsaacGym_Preview_4_Package.tar.gz on a proper folder. Then unzip it:
1
tar -xvf IsaacGym_Preview_4_Package.tar.gz
Go to the unzipped folder, and execute the create_conda_env_rlgpu.sh. This would automatically create a new environment, installed with all packages.
1
./create_conda_env_rlgpu.sh
Possible Problems
The shell may stuck at “Solving…” stage. In that case, please follow step 4 below.
[Alternative ways for step 3] If step 3 failed, consider the following method:
1 2 3 4 5 6 7 8
# Create an env manually. conda create -n rlgpu python=3.8
# Go the the subdirectory, cd python/
# Install manually. pip install -e .
The above code would also install the isaacgym, with necessary dependencies (pytorch, numpy, etc.)
As in my machine, installing with latest PyTorch (2.2.0) and CUDA (12.1) is fine. It doesn’t require a former version.
Test demo
To run the test demo, cd to python/examples, and run:
1
python joint_monkey.py
Possible Problem 1
When importing isaacgym, returns error ImportError: libpython3.8.so.1.0: cannot open shared object file: No such file or directory
Solution 1: This is because the module failed to locate the static link library. We can add the corresponding path to the LD_LIBRARY_PATH so that the python could locate the library.
1 2
# in ~/.bashrc export LD_LIBRARY_PATH=/<miniconda_root>/envs/<env_name>/lib:$LD_LIBRARY_PATH
Possible Problem 2
After executing python joint_monkey.py, it returns error [Error] [carb.windowing-glfw.plugin] GLFW initialization failed.
Solution 2: The test programs requires GUI. In the headless server, you may use X11 forwarding (e.g., MobaXterm) or xvfb virtual screen.
Possible Problem 3
After executing python joint_monkey.py, it returns error Segment Fault
Solution 3: There are no direct solutions on the Internet. After my experience, I can give you some possible reasons.
Newer PyTorch, CUDA version: It should not be a big problem. As for me, I am using PyTorch (2.2.0) and CUDA (12.1), the program stills works!
Don’t use WSL: By 2/1/2024, the Vulkan has not fully supported on WSL. Therefore, the program may occur such problems. Use Linux machine instead.
Vulkan Installation: Please make sure the vulkan works fine on the server. You may visit here for further information.
In this blog, we’ll learn pytorch-lightning framework with some simple example codes. I believe the code will significantly help you understand it. The official doc is at here.
1 2
# Before everything starts: import pytorch_lightning as pl
To train a deep learning model, we need to code the following components: data, model, training&testing procedures, and hyper-parameter configs. In pytorch-lightning, we have different classes handling them.
Data: we can define a subclass of pl.LightningDataModule to implement procedures that initialize the Dataset and DataLoader.
Model: implement the model just like what you did without pytorch-lightning – a subclass of nn.Module.
Training & Testing procedures: we can define a subclass of pl.LightningModule to implement the procedures.
Configs (pytorch-lightning have utilities for CLI arguments. But here we use another package called configargparse, which support both config file and CLI arguments)
1. Data
We can define a pl.LightningDataModule which implements procedures to initialize the Dataset and DataLoader.
Main components of pl.LightningDataModule:
__init__(): The constructor. You can save some configurations (hyper-parameters) to the class here.
setup(): Will be called before fit(), validate(), test(), and predict(). You can initialize the datasets as class attributes here. Note that it has an argument stage, to indicate what stage is it (Because we may create different datasets for different stages).
prepare_data(): Will be called only on Master process. In distribute training, setup() would be called on all processes. If you only want to only do one thing (e.g., downloading data), please implement it in the prepare_data().
train_dataloader(), val_dataloader(), test_dataloader(), predict_dataloader(). Will be called during the corresponding phase to get the DataLoader. It should return a DataLoader for that stage.
Here’s an Example. You can check detailed descriptions of each function at the function docstring:
# DataModule classMyDataModule(pl.LightningDataModule): def__init__(self, data_dir='./', batch_size=32): """ Initializes the data module with the some given config arguments. This constructor sets up the initial configurations like data directory, batch size, and transformations to be applied to the data. Called when an instance of MyDataModule is created. """ super().__init__() self.data_dir = data_dir self.batch_size = batch_size self.transform = transforms.Compose([ transforms.ToTensor(), transforms.Normalize((0.5,), (0.5,)) ]) defsetup(self, stage=None): """ Prepares the data for use. It is automatically called at the beginning of fit, validate, test, and predict, or when manually calling `trainer.setup`. This method is responsible for setting up internal datasets (e.g., splitting the dataset into training, validation, and testing sets, etc.) `stage` can be used to differentiate between fit, validate, and test stages. """ # Assign train/val datasets for use in dataloaders if stage == "fit": mnist_full = datasets.MNIST(self.data_dir, train=True, transform=self.transform) self.mnist_train, self.mnist_val = random_split( mnist_full, [55000, 5000], generator=torch.Generator().manual_seed(42) ) # Assign test dataset for use in dataloader(s) if stage == "test": self.mnist_test = datasets.MNIST(self.data_dir, train=False, transform=self.transform) if stage == "predict": self.mnist_predict = datasets.MNIST(self.data_dir, train=False, transform=self.transform) deftrain_dataloader(self): """ Creates and returns the DataLoader for the training dataset. This method is used to load the training data and is automatically called during the training phase. Returns a DataLoader instance for the training data. """ return DataLoader(self.mnist_train, batch_size=self.batch_size) defval_dataloader(self): """ Creates and returns the DataLoader for the validation dataset. This method is used to load the validation data and is automatically called during the validation phase. Returns a DataLoader instance for the validation data. """ return DataLoader(self.mnist_val, batch_size=self.batch_size, shuffle=False) deftest_dataloader(self): """ Creates and returns the DataLoader for the testing dataset. This method is used to load the test data and is automatically called during the testing phase. Returns a DataLoader instance for the test data. """ return DataLoader(self.mnist_test, batch_size=self.batch_size, shuffle=False)
2. Model
You may directly implement the model in pl.LightningModule, but for clarity, I recommend you to implement your model as a separate nn.Module subclass, and then create the instances in the pl.LightningModule.
1 2 3 4 5 6 7 8 9 10 11 12 13
# You can do like this... classMyLightningModule(pl.LightningModule): def__init__(self, hidden_dim=64): super().__init__() self.hidden_dim = hidden_dim self.layer1 = torch.nn.Linear(28 * 28, self.hidden_dim) self.layer2 = torch.nn.Linear(self.hidden_dim, 10)
defforward(self, x): x = x.view(x.size(0), -1) x = torch.relu(self.layer1(x)) x = self.layer2(x) return x
1 2 3 4 5 6 7 8 9 10 11
# But I recommend you to do like this: classModel(nn.Module): ......
We can define a pl.LightningModule which implements procedures for training, validating, testing and predicting.
Main components of pl.LightningModule:
__init__(): The constructor. You can save some configurations (hyper-parameters) to the class here.
forward(): Make it behave like a nn.Module. You can implement the forward procedures here (See Sec. 2 for the example).
configure_optimizers(): Defines the training optimizers. See here for some advanced usage.
train_step(), validation_step(), test_step(), predict_step(): Will be called during the corresponding phase, to perform operations for a batch. It has an argument batch_idx, which indicates the batch index of current epoch. The train_step() should return the loss (a scalar or a dict), and the module will automatically perform backward propagation.
on_train_epoch_start(), on_train_epoch_end(), on_XXX_epoch_start(), on_XXX_epoch_end(): Will be called at the corresponding start/end point. You can perform some epoch-level operations here. (See below example, where we collect all training batch losses to calculate the average loss on an epoch)
Use self.log(tag, value) to log the batch’s “tag” indicator with value “value” to the tensorboard / log file.
Here’s an Example. You can check detailed descriptions of each function at the function docstring:
classMyLightningModule(pl.LightningModule): def__init__(self, hidden_dim=64): """ Initializes the LightningModule with two linear layers. This constructor sets up the neural network architecture for the module. Called when an instance of MyLightningModule is created. """ super().__init__() self.hidden_dim = hidden_dim self.layer1 = torch.nn.Linear(28 * 28, self.hidden_dim) self.layer2 = torch.nn.Linear(self.hidden_dim, 10) self.training_results = [] # To store training loss in each epoch
defforward(self, x): """ Defines the forward pass of the model. It is automatically called when the model is used to make predictions. 'x' is the input data. The method reshapes the input, applies a ReLU activation after the first linear layer, and then passes it through the second linear layer. """ x = x.view(x.size(0), -1) x = torch.relu(self.layer1(x)) x = self.layer2(x) return x
deftraining_step(self, batch, batch_idx): """ Defines a single step in the training loop. It is automatically called for each batch of data during training. 'batch' contains the input data and labels, and 'batch_idx' is the index of the current batch. The method computes the model's loss using cross-entropy. """ x, y = batch logits = self(x) loss = F.cross_entropy(logits, y) self.log('train_loss', loss) self.training_results.append(loss) return loss
defvalidation_step(self, batch, batch_idx): ...
deftest_step(self, batch, batch_idx): ...
defconfigure_optimizers(self): """ Configures the optimizers used for training. This method is automatically called to configure the optimization algorithm. Returns an optimizer, in this case, Adam, with a set learning rate. See advanced usage in official docs. """ return torch.optim.Adam(self.parameters(), lr=0.001)
# Epoch-wise procedures defon_train_epoch_start(self): """ Called at the start of every training epoch. Can be used to perform actions specific to the beginning of each training epoch. """ print("Training Epoch Start")
defon_train_epoch_end(self): """ Called at the end of every training epoch. Can be used to perform actions specific to the end of each training epoch. """ print("Training Epoch End") print("Training Loss: ", sum(self.training_results) / len(self.training_results)) self.training_results.clear()
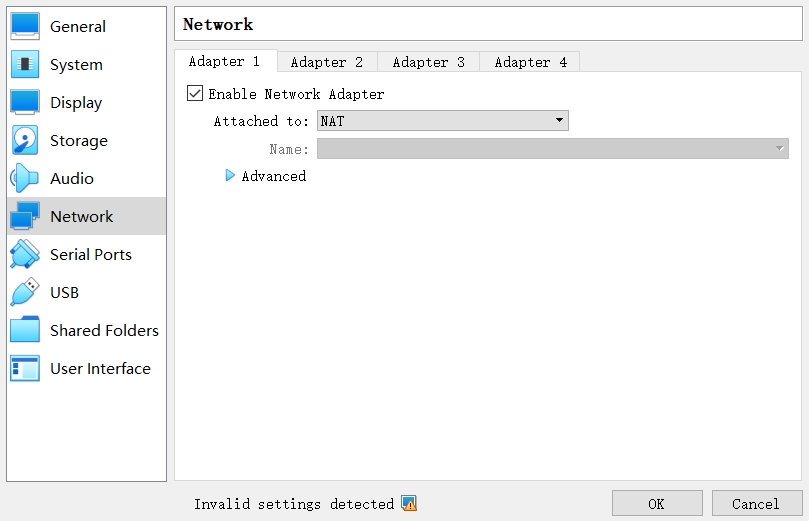
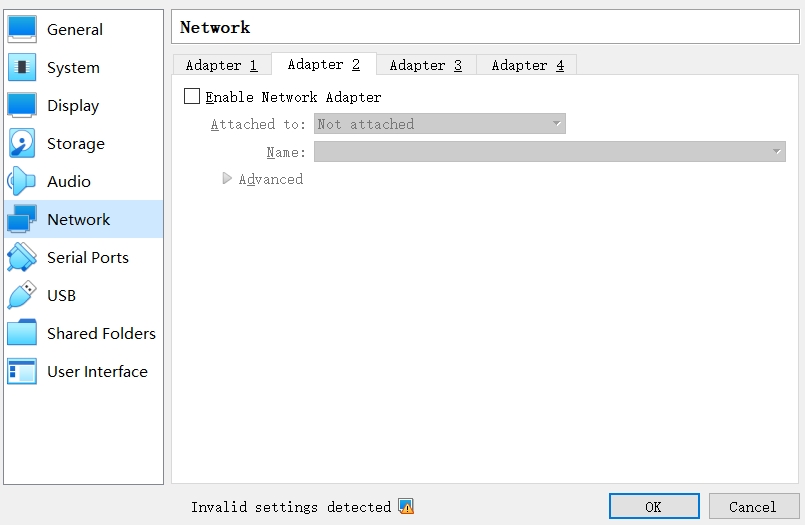
In some cases, when we import VM into the “Oracle VM VirtualBox Manager”, the network is not well configured, and we cannot connect it by SSH/other things on the host machine. The default network setting may looks like this:
The Adapter 1 (an NAT adapter):
The Adapter 2-4 (Not Enabled):
After typing ip a in the terminal of the VM (assume it is a Linux machine), the result looks like below:
1 2 3 4 5 6 7 8 9 10 11 12
1: lo: <LOOPBACK,UP,LOWER_UP> mtu 65536 qdisc noqueue state UNKNOWN group default qlen 1000 link/loopback 00:00:00:00:00:00 brd 00:00:00:00:00:00 inet 127.0.0.1/8 scope host lo valid_lft forever preferred_lft forever inet6 ::1/128 scope host valid_lft forever preferred_lft forever 2: enp0s3: <BROADCAST,MULTICAST,UP,LOWER_UP> mtu 1500 qdisc fq_codel state UP group default qlen 1000 link/ether 08:00:27:b3:8d:9b brd ff:ff:ff:ff:ff:ff inet 10.0.2.15/24 brd 10.0.2.255 scope global dynamic noprefixroute enp0s3 valid_lft 86376sec preferred_lft 86376sec inet6 fe80::6dea:8795:c7b1:a1a5/64 scope link noprefixroute valid_lft forever preferred_lft forever
There are no available network adapter to the host.
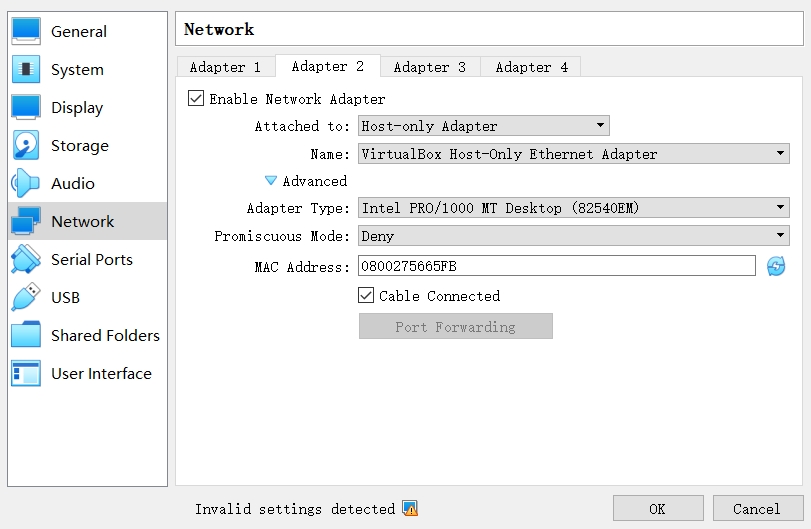
Method 1: By Host-only Adapter
Important!
Pros: It has a stable IP address, with all ports available. (e.g., setup different services on different ports, 22, 3389, ...)
Cons: The VM cannot be accessed from machine outside of the host (e.g., we cannot ssh host_name@host_ip to connect to the VM from other machines than host), unless you perform some port forwarding strategies on the host.
Steps:
To create a network connection from VM to host, we can set the Adapter 2 like below (Use a “Host-only Adapter”):
After typing ip a in the terminal of the VM (assume it is a Linux machine) NOW, the result looks like below:
1 2 3 4 5 6 7 8 9 10 11 12 13 14 15 16 17 18
1: lo: <LOOPBACK,UP,LOWER_UP> mtu 65536 qdisc noqueue state UNKNOWN group default qlen 1000 link/loopback 00:00:00:00:00:00 brd 00:00:00:00:00:00 inet 127.0.0.1/8 scope host lo valid_lft forever preferred_lft forever inet6 ::1/128 scope host valid_lft forever preferred_lft forever 2: enp0s3: <BROADCAST,MULTICAST,UP,LOWER_UP> mtu 1500 qdisc fq_codel state UP group default qlen 1000 link/ether 08:00:27:b3:8d:9b brd ff:ff:ff:ff:ff:ff inet 10.0.2.15/24 brd 10.0.2.255 scope global dynamic noprefixroute enp0s3 valid_lft 86337sec preferred_lft 86337sec inet6 fe80::6dea:8795:c7b1:a1a5/64 scope link noprefixroute valid_lft forever preferred_lft forever 3: enp0s8: <BROADCAST,MULTICAST,UP,LOWER_UP> mtu 1500 qdisc fq_codel state UP group default qlen 1000 link/ether 08:00:27:85:54:b0 brd ff:ff:ff:ff:ff:ff inet 192.168.56.101/24 brd 192.168.56.255 scope global dynamic noprefixroute enp0s8 valid_lft 537sec preferred_lft 537sec inet6 fe80::a598:692:2336:67d9/64 scope link noprefixroute valid_lft forever preferred_lft forever
The third network adapter, with an ip address 192.168.56.101, is the ip address of the “VirtualBox Host-Only Ethernet Adapter”. On the host machine, we can connect it by SSH fluently:
1
ssh ubuntu@192.168.56.101
By so far, you can connect the machine via SSH well. You can also connect to other services by ip address 192.168.56.101 on the host machine.
Method 2: Forward Port to Host
Important!
Pros: You can access the VM outside of the host machine, from a different machine.
Cons: Only forwarded ports available. Ports may conflict with others.
Steps:
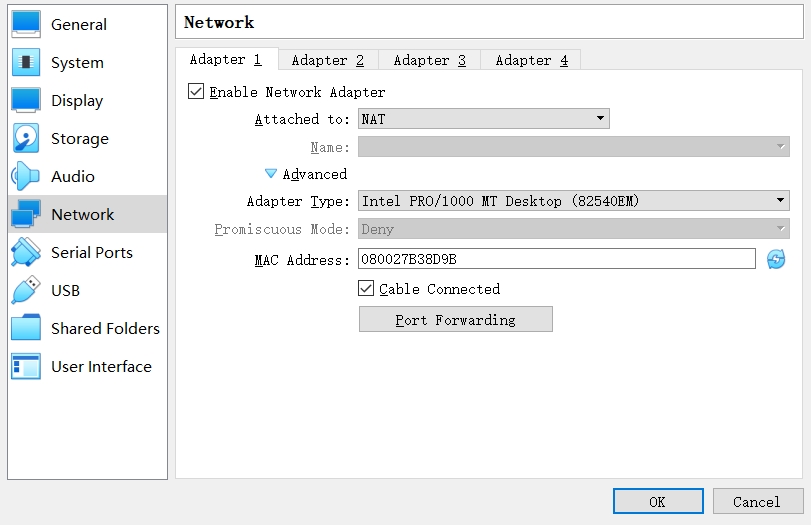
Go to the Adapter 1, click the “Advanced” button to expand the menu. Click the “Port Forwarding”.
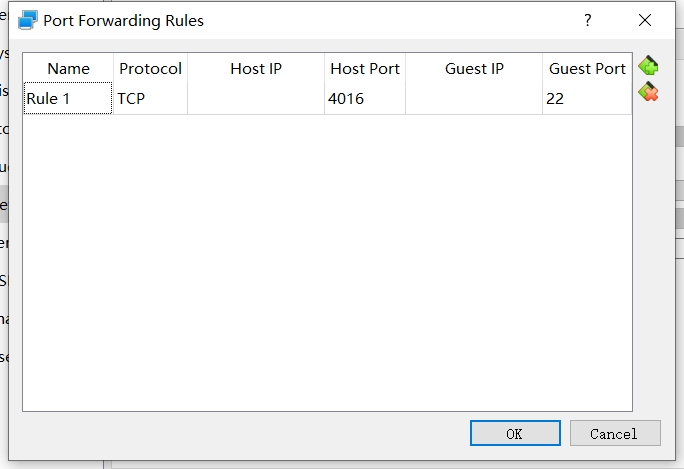
In the “Port Forwarding Rules”, Set up new rules. The “Host Port” is the port number on the host machine. The “Guest Port” is the corresponding port number on the VM. In this example, I forwarded port 4016 on host to the port 22 on the VM.
After that, you can connect to the VM on the host machine. Type:
1
ssh -p 4016 ubuntu@127.0.0.1
You can also connect to the VM outside of the host machine. Assume in the local network, my ip address is 10.31.38.94. So from the computer in the same local network, type:
1
ssh -p 4016 ubuntu@10.31.38.94
And everything should go fine. If something goes run, please check whether we have firewall permissions. If not, you can set a firewall rule for port 4016 (The port number you forwarded).
Conclusion
You can setup both Method 1 & Method 2!! Then you can experience all of these benefits (connect from other machines, all ports available on local machines, etc.) and avoid the disadvantages.
We usually use WSL and docker container for development. In most cases, when we install the WSL and container, we may need setup the SSH (secure shell) configuration by ourselves. This article shares my experience in setting up SSH in these environments.
1. Install & Config
Step 1: Install (Optional): If your the system has no ssh installed, you may use the package manager (e.g., yum, apk, apt based on which operating system you are using). E.g.,
(Optional): If you haven’t set the password yet, set one first.
1
passwd <user_name>
set up configs in sshd_config
Use any text editor, like vim, to modify the /etc/ssh/sshd_config if needed. Some important configs are:
1 2 3 4 5 6 7 8
# indicates which port listening to
Port 22
# Use public key authentication
PubkeyAuthentication yes
# Use password authentication
PasswordAuthentication yes
# Use X11 forwarding to forward a display in the remote shell
X11Forwarding yes
Use ssh -p <port> <username>@<ip_address> to start a SSH connection.
2.1 WSL
<port>: Unless specified in the /etc/ssh/sshd_config, the default port number is 22.
username: The one in the WSL.
The WSL is an independently installed operating system running on your machine, so it has a different ip address. To get the ip address, you can use the following command in the host’s powershell to get the <ip_address>:
<port>: When configuring the container, we usually forward the container’s 22 port to one in the host machine. Use that port number at the host machine.
<username>: Unless create other user, the container has only one default user, root.
ip_address: Since we have port forwarding, the ip_address is the host machine, 127.0.0.1 (or equivalently, the ip address from command ipconfig (Windows), or ifconfig/iwconfig (Linux))
3 Remote Visiting
In some cases, we may want to visit the WSL/docker on this host machine from other machines in the same local network.
3.1 WSL
Host Port Forwarding. Since WSL behaves like a separate machine, it has its own ip address. We should perform port forwarding so that the remote connection to this host machine can be forwarded to the WSL. Run the following command to set port forwarding through Powershell in admin privilage.
Firewall rules. We should set firewall permission rules, so that the connection would not be refused by the host machine. You may search additional online materials for how to allow TCP connection to the <listenport> you defined above, e.g., here.
Connect. Then, we can access by ssh -p 2222 <wsl_username>@<host_ipaddr>. The <host_ipaddr can be obtained by command ipconfig (Windows), or ifconfig/iwconfig (Linux).
Additional note: if something goes run, use netsh interface portproxy reset to reset the port forwarding.
3.2 Container
Connect by ssh -p <port> <wsl_username>@<host_ipaddr>, where:
<port> is the forwarded port number, and
<host_ipaddr> is the host’s ip address in the local network, obtained by command ipconfig (Windows), or ifconfig/iwconfig (Linux).